Earlier this June, I was puttering around Silver Fox Salvage in Albany’s Warehouse District. I’m not much of a furniture person; if it didn’t come from Huck Finn’s Warehouse or Goodwill, then it was too expensive for my taste.
But there it was. Tucked in behind dusty furniture and pipes and the like…
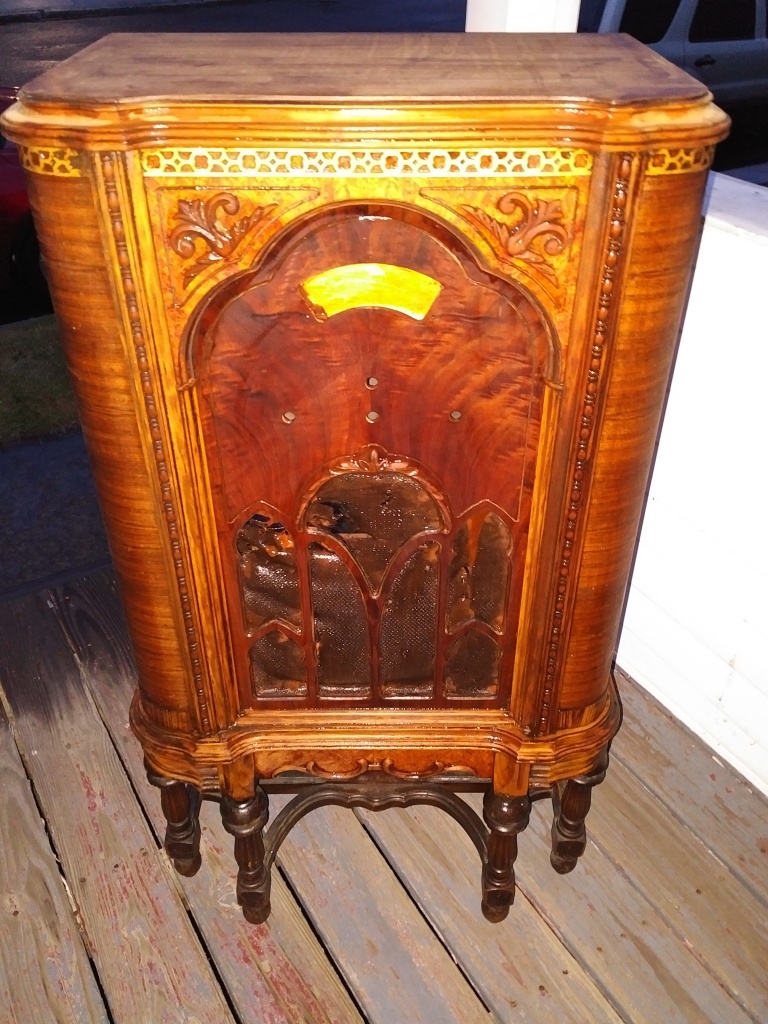
I saw this.
 //embedr.flickr.com/assets/client-code.js
Wow.
This is awesome.
I looked at the price tag. And I made a promise to myself.
I saw this cabinet prior to my summer vacation. If this cabinet was still here at Silver Fox when I got back…
Then I would purchase it.
Three weeks later, I went back to Silver Fox Salvage.
It was still there.
And yes, I kept my promise. I bought the cabinet, and two Silver Fox handymen helped me get the cabinet in my car. And it just … barely … fit inside Dracourage. Barely.
And before I took it inside the house, I snapped an Instagram photo of the cabinet.
A photo posted by Chuck Miller (@kchuckradio) on Jun 19, 2016 at 2:20pm PDT
//platform.instagram.com/en_US/embeds.js
Okay, let’s now play furniture detective. I looked inside the cabinet’s back panel. There should have been radio tubes and a dial and other mechanisms. Those were already removed.
All that was left of the cabinet’s former existence was a paper-thin advertising sticker.
A photo posted by Chuck Miller (@kchuckradio) on Jun 19, 2016 at 2:21pm PDT
//platform.instagram.com/en_US/embeds.js
So the cabinet was manufactured by the United States Radio and Television Corp., a radio manufacturing company out of Marion, Indiana. A little Internet digging on fultonhistory.com uncovered that this company was created from the merger of several smaller companies, and that this company produced radios under the brand names of Apex and Gloritone. This unit was marked as model 12B, and sold in 1932 for $107.50.
And just dig this flowery advertising language:
“Super-Quiet Automatic Volume Control absolutely cuts out all noises between stations and maintains reception always above the static level. The pure, clear tone, of matchless beauty, is strikingly faithful to the voice and instruments … The new “Triple Grid” tubes give greater selectivity, increased sensitivity and smoother reception than heretofore possible. The use of the new “Mercury Vapor” rectifier ensures maximum efficiency of operation under all conditions.”
And from another advertisement:
“Note the distinctive curved ends of the cabinet which is exquisitely wrought of the finest woods, including walnut with satin-wood overlays and oriental walnut veneers. The tone control and other equipment of a high grade radio are included. A newly developed, four-indicator illuminated Uni-Dial gives visibly the exact setting of all controls … the tube equipment includes three No. 58, two No. 57, three no. 56, three No. 46, and one no. 82.”
So here’s the thing. All that’s left of this radio is the cabinet itself. No superheterodyne thingamagigs, no Mercury Vapor rectifier tubes, no illuminated dials.
So whatever I do with this cabinet… it’s not a restoration back to a properly functioning radio. Sorry, people…
My initial thought was to carve out the front of the cabinet from the sides, flip the face 180 degrees, and hang it as a Dream Window. That initial thought lasted for about three days, and luckily it did not last for four days, lest I already start cutting.
Instead, I decided that the back of the cabinet would make an excellent hideaway spot for storing camera film and lenses. All I need to do is take off this godawful plywood backing and voila – extra storage space. Sweet.
But the front. Jeez, this thing looks as dingy as all hell.
I purchased a spray chemical stripper called Citristrip. It advertised that with one spritz, it would remove old paint and varnish. See results in 30 minutes.
I’m cool with that. I’m also cool with working on this project outside my house. Although Citristrip says you can use the product indoors, I didn’t want to inhale the airborne chemicals and turn my brain into cow manure.
I sprayed some of the stripper onto the top of the cabinet. 45 minutes later, I was able to wipe off the dingy, gunky brown-black varnish to reveal the wood grain underneath. I also noticed that some of the Citristrip dripped over the cabinet’s top ridge. Oh man, that’s not good. I grabbed a paper towel and wiped away the dripping compound – only to reveal the reddish-tan wood underneath. Wow. Even with drips and smears, this stuff works.
Okay. New test.
Another layer of Citristrip, this time on the top ridge. And if this works … 45 minutes later … I used a paper towel to remove the smeared, dripping varnish.
And here’s where I am after Day 1 of the project.
Day 1 of stripping the cabinet. The varnish is just dissolving away. #kchuckcabinet
A photo posted by Chuck Miller (@kchuckradio) on Jun 26, 2016 at 2:09pm PDT
//platform.instagram.com/en_US/embeds.js
Aces.
Day 2. I sprayed a liberal amount of Citristrip along the cabinet’s left side. One hour later, I was able to remove decades of varnish and tarnish with a single wipe. Smooth.
https://www.instagram.com/p/BHLZla3gExR/
I felt invigorated and energized – and I certainly hope that wasn’t from the residual fumes from the Citristrip.
Nevertheless, I continued on. Day 3. I got the right side of the cabinet stripped… then it was time to tackle the front, with all its curves and carvings and mullions and the like.
I sprayed the Citristrip on the front. Waited an hour. Went back outside to the cabinet, and I used a nylon-bristled brush to wipe away the varnish. I dipped the brush in a bucket filled with hot water and cleanser, and continued wiping and wiping and wiping.
And last night…
This came out.

Now mind you, this is the first time I’ve ever worked with chemical strippers. But it looks a helluva lot better than when I found it in the salvage yard, don’tcha think?
But I’m not done yet. Not by any means.
I’m taking out that tattered, shredded grille and replacing it with – something. The upper part of the cabinet face – where that yellowish semicircle is, where an escutcheon used to be – I’m replacing that with – something. Those four holes where the dial knobs are missing – I’m fixing those holes with – something.
Plus, I have to decide if I’m going to use more chemical strippers on this bad boy, or start sealing the wood with some clear coat. Trust me, even though I’ve been working on this project outside, with plenty of fresh air and gloves and masks, I’ve dealt with enough chemical stripping fumes, you would think I’ve sung a duet with Elvis Presley.
So yeah, this is the first part of the project I’ve nicknamed the “K-Chuck Cabinet.”
I’ve made this much progress.
But I’m not done yet.
Not by a long shot.

A beautiful piece, Chuck. My Dad had an old radio and cabinet very similar to this in our basement when I was a youngster. If I remember right it was still there when we sold the house. Don’t wait too long to seal the newly stripped wood to protect the beauty of it.
LikeLike
Nice job. I spent a summer sanding, stripping and sanding some more…and it was all worth it. You’ll treasure this even more by the time it’s finished, no doubt about it.
LikeLike
Nice Chuck, beautiful wood. I may try that stripper on a vintage GE 1920 Radio that I have home stored in a crawl space. I’ve been meaning to get it out of there and make it part of the living area. Best of luck with the rest of restoration and thanks for giving me a new idea today!
LikeLike
Nicely done Chuck!
LikeLike